Finding the Correct Moulding Angles at An Irregular Corner

When looking for the correct cutting angle for crown moulding, it’s a lot cheaper to test fit and cut scrap lengths of sheet stock than to risk experimenting with your actual moulding.
This is especially true when you have an irregular outer corner. Experienced carpenters know that not all 90 ° wall corners are precisely 90°. Normally, a slight variation will not mean a noticeably poor join where your moulding turns that corner.
You can safely cut 45° angles and a small amount of filler and paint will result in a clean and professional-looking corner.
However, if the outer angle varies too far off 90°, or if the walls are meeting at a much different angle, this tip should save you from expensive mistakes.
This tip will also serve as a handy method of getting the correct moulding angles without conversion tables or calibrated measuring tools.
The first step is to rip lengths of scrap 1/4″ or 3/8″ sheet stock into slats about 4″-5″ wide.
The actual measurements can vary. The important part is that the slats are exactly the same width.
Next, Set the slats flat up against the ceiling at the corner where the moulding will meet. Make sure their edges are flat against the wall.
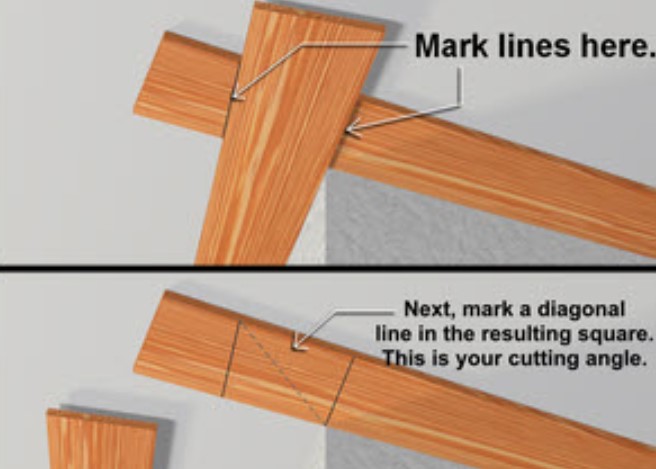
Overlap the slats so that they extend beyond each other by an inch or two. Mark two pencil lines using the edges of the lower slat where it presses flat up against the upper Slat.
When you separate the scrap lengths now, you’ll have one with two lines across it forming a box.
Using another straight edge, mark a pencil line from one corner of that box to the other. This is your cutting angle. Try to match your miter saw precisely to the angle of that line.
Once you have it lined up as closely as possible, cut that angle on your strips of sheet stock and test-fit them in that corner. A clean, flat and uniform meeting of the edges will show that you have the right angle for your saw.
The cuts you make to fit your actual crown moulding will result in a neat, professional-looking seam.


